Testing against production data with branch deployments
This guide covers testing Dagster code against cloned production data in your cloud environment without impacting your actual production data. We'll use Dagster+ branch deployments and a Snowflake database to:
- Execute code on a feature branch in Dagster+
- Read and write to a unique per-branch clone of our production Snowflake data
This feature is only available in Dagster+.
Here's an overview of the main concepts we'll be using:
- Assets - We'll define three assets that each persist a table to Snowflake.
- Ops - We'll define two ops that query Snowflake. The first will clone a database, and the second will drop database clones.
- Graphs - We'll build graphs that define the order in which our ops should run.
- Jobs - We'll define jobs by binding our graphs to resources.
- Resources - We'll use the
SnowflakeResourceto swap in different Snowflake connections to our jobs depending on environment. - I/O managers - We'll use a Snowflake I/O manager to persist asset outputs to Snowflake.
Prerequisites
To complete the steps in this guide, you'll need:
- A Dagster+ account
- An empty Dagster project created with the
create-dagster projectCLI. For more information, see Creating Dagster projects. - An existing branch deployments setup in the project that uses GitHub actions or GitLab CI/CD. Your setup should contain the following files:
- Either a GitHub actions workflow file (e.g.
.github/workflows/dagster-plus-deploy.yml(Serverless) ordagster-cloud-deploy.yml(Hybrid)) or a GitLab CI/CD file (e.g..gitlab-ci.yml) - A Dockerfile that installs your Dagster project (Dagster+ Hybrid only)
- Either a GitHub actions workflow file (e.g.
- User permissions in Dagster+ that allow you to access branch deployments
Overview
We have a PRODUCTION Snowflake database with a schema named HACKER_NEWS. In our production cloud environment, we'd like to write tables to Snowflake containing subsets of Hacker News data. These tables will be:
ITEMS- A table containing the entire datasetCOMMENTS- A table containing data about commentsSTORIES- A table containing data about stories
To set up a branch deployment workflow to construct and test these tables, we will:
- Create assets from these tables.
- Configure our assets to write to Snowflake using a different connection (credentials and database name) for two environments: production and branch deployment.
- Write a job that will clone the production database upon each branch deployment launch. Each clone will be named
PRODUCTION_CLONE_<ID>, where<ID>is the pull request ID of the branch. - Create a branch deployment and test our Hacker News assets against our newly cloned database.
- Write a job that will delete the corresponding database clone upon closing the feature branch.
Step 1: Create assets from Snowflake tables
In production, we want to write three tables to Snowflake: ITEMS, COMMENTS, and STORIES. We can define these tables as assets as follows:
# assets.py
import pandas as pd
import requests

import dagster as dg


class ItemsConfig(dg.Config):
    base_item_id: int


@dg.asset(
    io_manager_key="snowflake_io_manager",
)
def items(config: ItemsConfig) -> pd.DataFrame:
    """Items from the Hacker News API: each is a story or a comment on a story."""
    rows = []
    max_id = requests.get(
        "https://hacker-news.firebaseio.com/v0/maxitem.json", timeout=5
    ).json()
    # Hacker News API is 1-indexed, so adjust range by 1
    for item_id in range(max_id - config.base_item_id + 1, max_id + 1):
        item_url = f"https://hacker-news.firebaseio.com/v0/item/{item_id}.json"
        rows.append(requests.get(item_url, timeout=5).json())

    # ITEM_FIELD_NAMES is a list of the column names in the Hacker News dataset
    result = pd.DataFrame(rows, columns=ITEM_FIELD_NAMES).drop_duplicates(subset=["id"])
    result.rename(columns={"by": "user_id"}, inplace=True)
    return result


@dg.asset(
    io_manager_key="snowflake_io_manager",
)
def comments(items: pd.DataFrame) -> pd.DataFrame:
    """Comments from the Hacker News API."""
    return items[items["type"] == "comment"]


@dg.asset(
    io_manager_key="snowflake_io_manager",
)
def stories(items: pd.DataFrame) -> pd.DataFrame:
    """Stories from the Hacker News API."""
    return items[items["type"] == "story"]
As you can see, our assets use an I/O manager named snowflake_io_manager. Using I/O managers and other resources allow us to swap out implementations per environment without modifying our business logic.
Step 2: Configure our assets for each environment
At runtime, we'd like to determine which environment our code is running in: branch deployment or production. This information dictates how our code should execute, specifically with which credentials and with which database.
To ensure we can't accidentally write to production from within our branch deployment, we'll use a different set of credentials from production and write to our database clone.
Dagster automatically sets certain environment variables containing deployment metadata, allowing us to read these environment variables to discern between deployments. We can access the DAGSTER_CLOUD_IS_BRANCH_DEPLOYMENT environment variable to determine the currently executing environment.
Because we want to configure our assets to write to Snowflake using a different set of credentials and database in each environment, we'll configure a separate I/O manager for each environment:
import os

from dagster_snowflake_pandas import SnowflakePandasIOManager

import dagster as dg

snowflake_config = {
    "account": "abc1234.us-east-1",
    "user": "system@company.com",
    "password": {"env": "SYSTEM_SNOWFLAKE_PASSWORD"},
    "schema": "HACKER_NEWS",
}

resources = {
    "branch": {
        "snowflake_io_manager": SnowflakePandasIOManager(
            **snowflake_config,
            database=f"PRODUCTION_CLONE_{os.getenv('DAGSTER_CLOUD_PULL_REQUEST_ID')}",
        ),
    },
    "prod": {
        "snowflake_io_manager": SnowflakePandasIOManager(
            **snowflake_config,
            database="PRODUCTION",
        ),
    },
}


def get_current_env():
    is_branch_depl = os.getenv("DAGSTER_CLOUD_IS_BRANCH_DEPLOYMENT") == "1"
    assert is_branch_depl is not None  # env var must be set
    return "branch" if is_branch_depl else "prod"


@dg.definitions
def resources():
    return dg.Definitions(resources=resources[get_current_env()])  # ty: ignore[not-subscriptable]
Refer to the Dagster+ environment variables documentation for more info about available environment variables.
Step 3: Write a job to manage database cloning per branch deployment
We'll first need to define a job that clones our PRODUCTION database for each branch deployment. Later, in our GitHub actions workflow, we can trigger this job to run upon each redeploy. Each clone will be named PRODUCTION_CLONE_<ID> with <ID> representing the pull request ID, ensuring each branch deployment has a unique clone. This job will drop a database clone if it exists and then reclone from production, ensuring each redeployment has a fresh clone of PRODUCTION:
We'll be writing ops to clone the production database for each branch deployment and drop the clone once the branch is merged. In this case, we chose to use ops since we are primarily interested in the task that's being performed: cloning or dropping the database.
Additionally, we don't need asset-specific features for these tasks, like viewing them in the Global Asset Graph.
import os

from dagster_snowflake import SnowflakeResource

import dagster as dg


@dg.op
def drop_database_clone(snowflake: SnowflakeResource):
    with snowflake.get_connection() as conn:
        cur = conn.cursor()
        cur.execute(
            "DROP DATABASE IF EXISTS"
            f" PRODUCTION_CLONE_{os.environ['DAGSTER_CLOUD_PULL_REQUEST_ID']}"
        )


@dg.op(ins={"start": dg.In(dg.Nothing)})
def clone_production_database(snowflake: SnowflakeResource):
    with snowflake.get_connection() as conn:
        cur = conn.cursor()
        cur.execute(
            "CREATE DATABASE"
            f" PRODUCTION_CLONE_{os.environ['DAGSTER_CLOUD_PULL_REQUEST_ID']} CLONE"
            ' "PRODUCTION"'
        )


@dg.graph
def clone_prod():
    clone_production_database(start=drop_database_clone())


@dg.graph
def drop_prod_clone():
    drop_database_clone()
We've defined drop_database_clone and clone_production_database to utilize the SnowflakeResource. The Snowflake resource will use the same configuration as the Snowflake I/O manager to generate a connection to Snowflake. However, while our I/O manager writes outputs to Snowflake, the Snowflake resource executes queries against Snowflake.
We now need to define resources that configure our jobs to the current environment. We can modify the resource mapping by environment as follows:
resources = {
    "branch": {
        "snowflake_io_manager": SnowflakePandasIOManager(
            **snowflake_config,
            database=f"PRODUCTION_CLONE_{os.getenv('DAGSTER_CLOUD_PULL_REQUEST_ID')}",
        ),
        "snowflake": SnowflakeResource(
            **snowflake_config,
            database=f"PRODUCTION_CLONE_{os.getenv('DAGSTER_CLOUD_PULL_REQUEST_ID')}",
        ),
    },
    "prod": {
        "snowflake_io_manager": SnowflakePandasIOManager(
            **snowflake_config,
            database="PRODUCTION",
        ),
        "snowflake": SnowflakeResource(**snowflake_config, database="PRODUCTION"),
    },
}


def get_current_env():
    is_branch_depl = os.getenv("DAGSTER_CLOUD_IS_BRANCH_DEPLOYMENT")
    assert is_branch_depl is not None  # env var must be set
    return "branch" if is_branch_depl else "prod"


@dg.definitions
def resources():
    return dg.Definitions(
        resources=resources[get_current_env()],  # ty: ignore[not-subscriptable]
    )
Then, we can add the clone_prod and drop_prod_clone jobs that now use the appropriate resource to the environment and add them to our definitions:
branch_deployment_jobs = [
    clone_prod.to_job(),
    drop_prod_clone.to_job(),
]


@dg.definitions
def jobs():
    return dg.Definitions(
        jobs=(
            branch_deployment_jobs
            if os.getenv("DAGSTER_CLOUD_IS_BRANCH_DEPLOYMENT") == "1"
            else []
        ),
    )
Step 4: Create database clone upon opening a branch
- Using GitHub Actions
- Using GitLab CI/CD
The Dagster workflow file located in .github/workflows defines a dagster_cloud_build_push job with a series of steps that launch a branch deployment.
Because we want to queue a run of clone_prod within each deployment after it launches, we'll add an additional step at the end dagster_cloud_build_push. This job is triggered on the opened, synchronize, reopen, and closed pull request events. This means that upon future pushes to the branch, we'll trigger a run of clone_prod. The if condition below ensures that clone_prod will not run if the pull request is closed:
- Serverless
- Hybrid
name: Dagster Branch Deployments
  on:
    pull_request:
      types: [opened, synchronize, reopened, closed]
  env:
    DAGSTER_CLOUD_URL: ${{ secrets.DAGSTER_CLOUD_URL }}

  jobs:
    dagster_cloud_build_push:
      runs-on: ubuntu-latest
      name: Dagster Branch Deployments
      strategy:
        ...
      steps:
        # Existing steps here
        ...
        - name: Clone Snowflake schema upon launch
          if: github.event.action != 'closed'
          uses: dagster-io/dagster-cloud-action/actions/utils/run@v0.1
          with:
            location_name: ${{ matrix.location.name }}
            deployment: ${{ steps.deploy.outputs.deployment }}
            job_name: clone_prod
          env:
            DAGSTER_CLOUD_URL: ${{ secrets.DAGSTER_CLOUD_URL }}
            DAGSTER_CLOUD_API_TOKEN: ${{ secrets.DAGSTER_CLOUD_API_TOKEN }}
Opening a pull request for our current branch will automatically kick off a branch deployment. After the deployment launches, we can confirm that the clone_prod job has run:
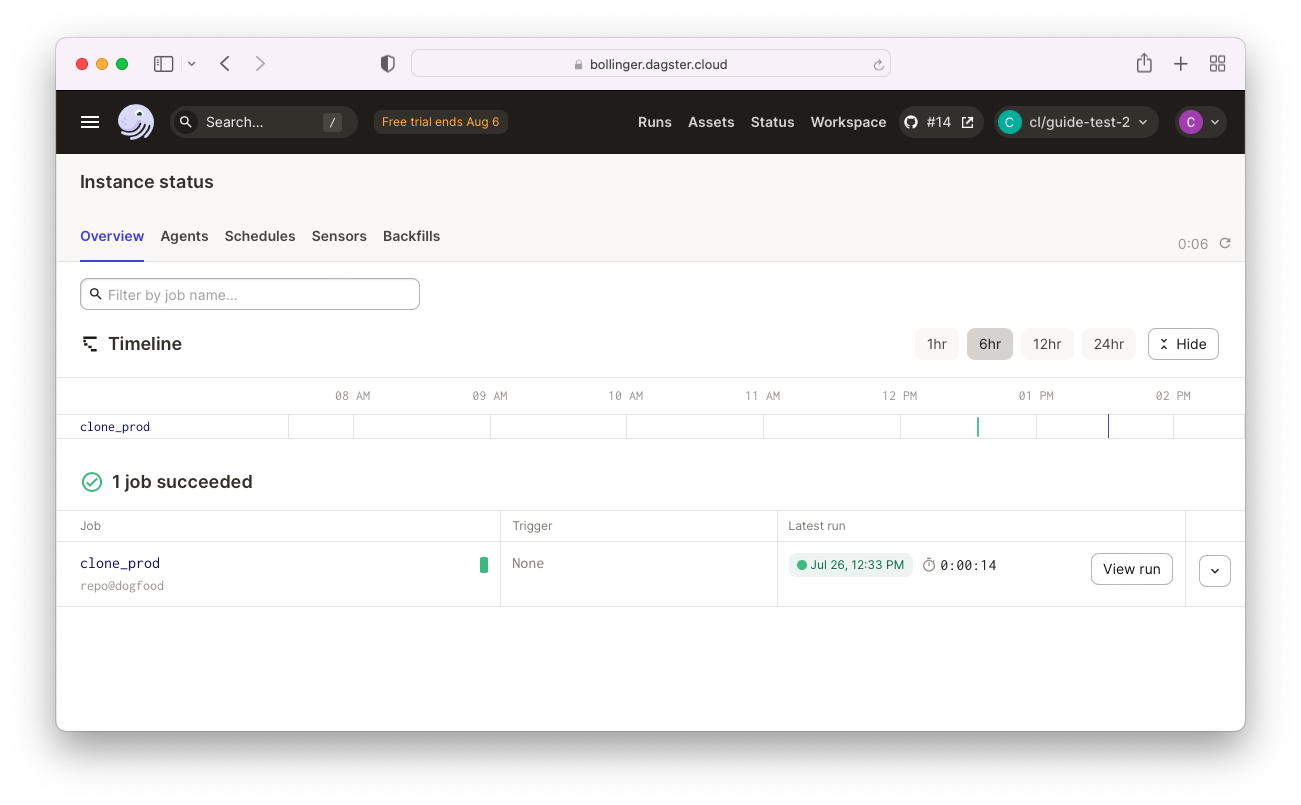
Alternatively, the logs for the branch deployment workflow can be found in the Actions tab on the GitHub pull request.
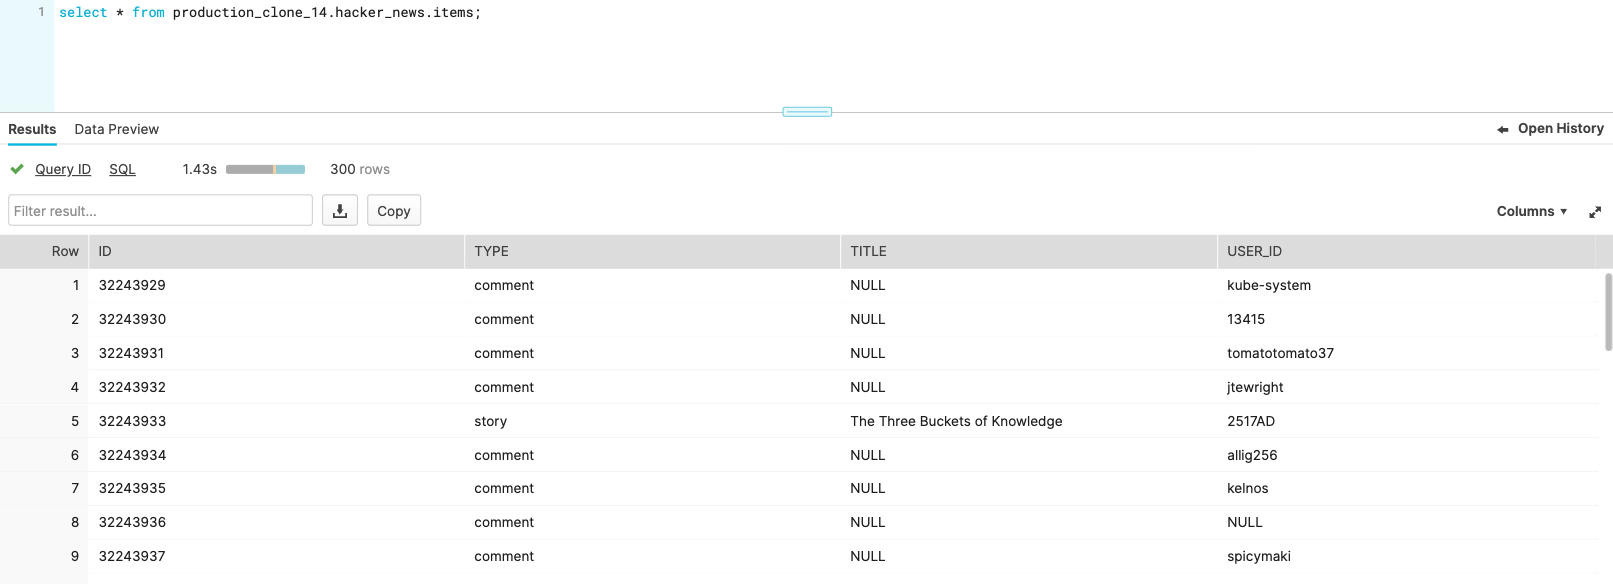
We can also view our database in Snowflake to confirm that a clone exists for each branch deployment. When we materialize our assets within our branch deployment, we'll now be writing to our clone of PRODUCTION. Within Snowflake, we can run queries against this clone to confirm the validity of our data:
The .gitlab-ci.yaml script contains a deploy job that defines a series of steps that launch a branch deployment. Because we want to queue a run of clone_prod within each deployment after it launches, we'll add an additional step at the end of deploy. This job is triggered on when a merge request is created or updated. This means that upon future pushes to the branch, we'll trigger a run of clone_prod.
stages:
  - setup
  - build
  - deploy

workflow:
  rules:
    - if: $CI_COMMIT_BRANCH == $CI_DEFAULT_BRANCH
    - if: $CI_PIPELINE_SOURCE == 'merge_request_event'

parse-workspace:
  ...

build-image:
  ...

deploy-docker:
  ...

deploy-docker-branch:
  stage: deploy
  rules:
    - if: $CI_PIPELINE_SOURCE == 'merge_request_event'
  dependencies:
    - build-image
    - parse-workspace
  image: ghcr.io/dagster-io/dagster-cloud-action:0.1.23
  script:
    # Existing steps here
    ...

    # Add a step to launch the job cloning the prod db
    - dagster-plus job launch
      --url "$DAGSTER_CLOUD_URL/$DEPLOYMENT_NAME"
      --api-token "$DAGSTER_CLOUD_API_TOKEN"
      --location "location_name_containing_clone_prod_job"
      --job clone_prod
  environment:
    name: branch/$CI_COMMIT_REF_NAME
    on_stop: close_branch

close_branch:
  ...
Opening a merge request for our current branch will automatically kick off a branch deployment. After the deployment launches, we can confirm that the clone_prod job has run:
We can also view our database in Snowflake to confirm that a clone exists for each branch deployment. When we materialize our assets within our branch deployment, we'll now be writing to our clone of PRODUCTION. Within Snowflake, we can run queries against this clone to confirm the validity of our data:
Step 5: Delete database clone upon closing a branch
- Using GitHub Actions
- Using GitLab CI/CD
Finally, we can add a step to our Dagster+ workflow file that queues a run of our drop_prod_clone job:
- Serverless
- Hybrid
name: Dagster Branch Deployments
  on:
    pull_request:
      types: [opened, synchronize, reopened, closed]
  env:
    DAGSTER_CLOUD_URL: ${{ secrets.DAGSTER_CLOUD_URL }}

  jobs:
    dagster_cloud_build_push:
      runs-on: ubuntu-latest
      name: Dagster Branch Deployments
      strategy:
        ...
      steps:
        # Existing steps here
        ...
        - name: Clone Snowflake schema upon launch
          ...
        - name: Delete schema clone upon PR close
          if: github.event.action == 'closed'
          uses: dagster-io/dagster-cloud-action/actions/utils/run@v0.1
          with:
            location_name: ${{ matrix.location.name }}
            deployment: ${{ steps.deploy.outputs.deployment }}
            job_name: drop_prod_clone
          env:
            DAGSTER_CLOUD_URL: ${{ secrets.DAGSTER_CLOUD_URL }}
            DAGSTER_CLOUD_API_TOKEN: ${{ secrets.DAGSTER_CLOUD_API_TOKEN }}
Finally, we can add a step to our .gitlab-ci.yml file that queues a run of our drop_prod_clone job:
stages:
  - setup
  - build
  - deploy

workflow:
  rules:
    - if: $CI_COMMIT_BRANCH == $CI_DEFAULT_BRANCH
    - if: $CI_PIPELINE_SOURCE == 'merge_request_event'

parse-workspace:
  ...

build-image:
  ...

deploy-docker:
  ...

deploy-docker-branch:
  ...

close_branch:
  stage: deploy
  image: ghcr.io/dagster-io/dagster-cloud-action:0.1.23
  when: manual
  only:
    - merge_requests
  script:
    # Existing steps here
    ...

    # Add a step to launch the job dropping the cloned db
    - dagster-plus job launch
      --url "$DAGSTER_CLOUD_URL/$DEPLOYMENT_NAME"
      --api-token "$DAGSTER_CLOUD_API_TOKEN"
      --location "location_name_containing_drop_prod_clone_job"
      --job drop_prod_clone
  environment:
    name: branch/$CI_COMMIT_REF_NAME
    action: stop
After merging our branch, viewing our Snowflake database will confirm that our branch deployment step has successfully deleted our database clone.
We've now built an elegant workflow that enables future branch deployments to automatically have access to their own clones of our production database that are cleaned up upon merge.